Introduction
A weed eater head is an essential part of any gardening tool. It is the piece that holds the string used to cut weeds and other vegetation. The head needs to be replaced periodically when it becomes worn or damaged. Knowing how to change a weed eater head is important for keeping your gardening tools in good condition.
Step-by-Step Guide on How to Change a Weed Eater Head
Changing a weed eater head requires some preparation and care. Here is a step-by-step guide to help you get the job done right.
Preparing the Weed Eater
Before you can replace the head, you will need to prepare the weed eater. This includes gathering the necessary tools, turning off the power, and removing the spool.
- Gathering Necessary Tools: You will need a screwdriver, a wrench, and the replacement head. Make sure you have all the tools and parts before you start.
- Turning Off the Power: Unplug the weed eater from the power source or remove the battery. This will ensure that no one is accidentally injured while you are replacing the head.
- Removing the Spool: Remove the spool from the weed eater. This will give you access to the head so that it can be replaced.
Replacing the Weed Eater Head
Now that you have prepared the weed eater, you are ready to replace the head. Follow these steps to ensure that the replacement is done correctly.
- Choosing the Right Replacement Head: Make sure that you choose a replacement head that is compatible with your weed eater. Check the manufacturer’s specifications to determine the correct size and type of head for your model.
- Installing the New Head: Use the screwdriver and wrench to loosen the bolts that hold the old head in place. Once the bolts are removed, insert the new head and secure it with the bolts.
- Securing the Head in Place: Tighten the bolts until the head is firmly in place. Make sure that the head is securely attached to the weed eater.
- Testing the Connection: Turn on the power and test the connection between the weed eater and the head. Make sure that the head is spinning correctly and that there are no leaks or other problems.
Video Tutorial on Replacing a Weed Eater Head
If you are having difficulty understanding the steps for replacing the head, you can watch a video tutorial. This will show you the process step-by-step and make it easier to understand.
- Finding the Right Tutorial: Look online for a tutorial that is specific to your model of weed eater. This will ensure that the instructions are accurate and helpful.
- Watching the Tutorial: Watch the tutorial carefully and follow along with the steps. Pay attention to any special instructions that the video may provide.
- Following the Steps: As you watch the video, take notes and follow each step as it is demonstrated. This will help you to remember the steps and make it easier to complete the task.

Five Easy Steps for Replacing a Weed Eater Head
For a quick overview of the process, here are the five easy steps for replacing a weed eater head:
- Step 1: Gather Necessary Tools: Collect the tools and parts needed to complete the job.
- Step 2: Turn Off Power: Unplug the weed eater or remove the battery to prevent injury.
- Step 3: Remove the Spool: Take off the spool to access the head.
- Step 4: Choose and Install the New Head: Choose the right replacement head and install it using the screws and bolts.
- Step 5: Test the Connection: Turn on the power and check that the connection is working properly.
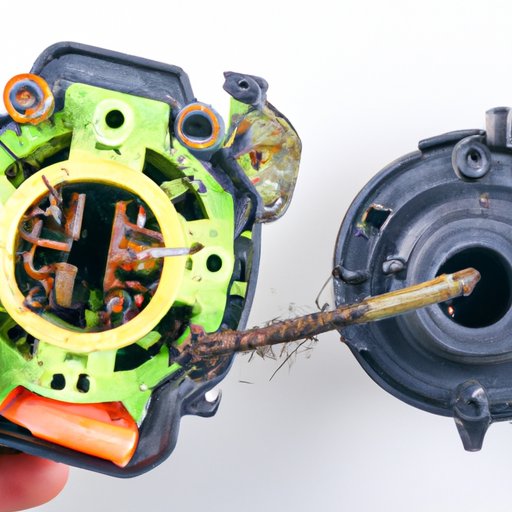
Illustrated Guide on Changing a Weed Eater Head
An illustrated guide can also be helpful when changing the head of a weed eater. Visuals can make it easier to understand the steps and see the correct technique for installing the new head.
- Visuals for Preparing the Weed Eater: Pictures and diagrams of the tools needed and the process of turning off the power and removing the spool.
- Visuals for Replacing the Weed Eater Head: Images of the right replacement head, how to install it, and how to secure it in place.

Tips and Tricks for Changing a Weed Eater Head
Once you know how to change a weed eater head, there are some tips and tricks that can help you do it quickly and safely.
- Wearing Safety Gear: Wear protective gear such as gloves and safety glasses when working with the weed eater. This will protect you from any injuries caused by flying debris.
- Taking Time to Check the Connections: Make sure that all the connections are secure before testing the weed eater. This will help to ensure that it works properly and won’t malfunction.
- Lubricating the Parts: Apply lubricant to the parts of the weed eater before assembling them. This will make the process easier and help to keep the parts in good condition.
A Beginner’s Guide to Replacing a Weed Eater Head
If you are new to changing a weed eater head, there are some things that you should know. Here are some tips for beginners.
- What You Need to Know: Understand the basic steps for changing the head and familiarize yourself with the tools and parts needed.
- Things to Look Out For: Pay attention to any warning signs that the weed eater is not working properly. This will help you to identify any potential problems before they become serious.

DIY Guide to Replacing a Weed Eater Head
Replacing the head of a weed eater is a relatively simple task that can be completed with minimal tools and parts. Here are some benefits and potential pitfalls of doing it yourself.
- Benefits of Doing It Yourself: Doing it yourself can save you time and money. You will also gain valuable experience and knowledge about maintaining your own gardening tools.
- Potential Pitfalls: If you are not careful, you could end up damaging the weed eater or causing an injury. Be sure to follow the instructions carefully and take all necessary precautions.
Conclusion
Changing a weed eater head is a relatively simple process that can be completed in a few easy steps. Preparing the weed eater, choosing the right replacement head, and securing it in place are all important steps. With the right tools and a bit of patience, you can easily replace the head of your weed eater. Remember to wear safety gear and take time to check the connections before testing the weed eater.
(Note: Is this article not meeting your expectations? Do you have knowledge or insights to share? Unlock new opportunities and expand your reach by joining our authors team. Click Registration to join us and share your expertise with our readers.)