Introduction
A weed eater head is an important part of a weed eater that helps maintain the garden or lawn. It is also known as a trimmer head, and it consists of a spool, line, and blades that help trim grass and weeds. Knowing how to take off the weed eater head is essential for proper maintenance and repair. This article will provide a step-by-step guide to taking off a weed eater head, along with safety tips and precautions.
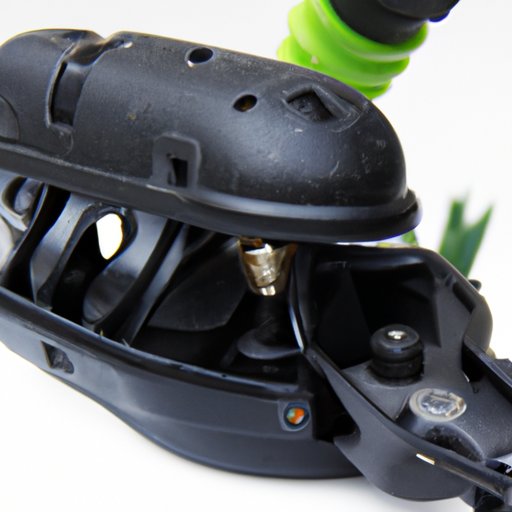
Step-by-Step Guide to Removing a Weed Eater Head
Removing a weed eater head is a straightforward process. Here are the steps to take when taking off a weed eater head:
Unscrewing the Screws
The first step to taking off a weed eater head is to locate the screws that hold the head in place. Use a screwdriver or wrench to remove the screws. Make sure to keep track of which screws go where so that you can easily put them back in the right place when you’re done.
Disconnecting the Wires
The next step is to disconnect any wires that may be attached to the weed eater head. Be careful not to pull too hard on the wires, as this could damage the connections. Once the wires have been disconnected, you can proceed to the next step.
Pulling off the Head
Now that all the necessary parts have been disconnected, you can carefully pull off the weed eater head. Be careful not to pull too hard, as this could cause damage to the head or the machine itself. Once the head has been removed, you can proceed to the next step.

How to Safely Remove the Head of a Weed Eater
When removing a weed eater head, it’s important to follow certain safety precautions. Here are some tips to keep in mind when taking off a weed eater head:
Wear Protective Gear
When taking off a weed eater head, it’s important to wear protective gear such as gloves, safety glasses, and long sleeves. This will help protect you from any debris that may be kicked up while you’re working.
Use the Right Tools
It’s important to use the right tools when removing a weed eater head. Using the wrong tool could damage the head or the machine itself. Make sure to use a screwdriver or wrench that is the right size and shape for the job.
Be Careful of the Blades
When taking off a weed eater head, it’s important to be careful of the blades. They can be sharp and can cause serious injury if handled incorrectly. Make sure to keep your hands away from the blades to avoid injury.

Quick and Easy Tips for Taking Off a Weed Eater Head
Here are some quick and easy tips for taking off a weed eater head:
Make Sure the Weed Eater Is Unplugged
Before taking off the weed eater head, make sure the weed eater is unplugged. This will help prevent any accidents from occurring.
Locate the Screws
Once the weed eater is unplugged, locate the screws that hold the head in place. Use a screwdriver or wrench to remove the screws.
Use a Wrench or Pliers to Loosen the Screws
Use a wrench or pliers to loosen the screws. Make sure to use the correct size and shape for the job. This will help ensure that the screws don’t get stripped or damaged.
The Proper Way to Disassemble a Weed Eater
When disassembling a weed eater, it’s important to follow the manufacturer’s instructions. Here are the steps to take when disassembling a weed eater:
Gather the Necessary Materials
Gather the necessary materials such as a screwdriver, wrench, and pliers. Make sure you have all the necessary tools before you begin.
Follow the Manufacturer’s Instructions
Follow the manufacturer’s instructions for taking apart the weed eater. This will help ensure that the parts are put back together correctly.
Put All Parts in an Organized Place
Once all the parts have been taken apart, put them in an organized place. This will make it easier to find the parts when you’re ready to reassemble the weed eater.

A Comprehensive Guide to Unscrewing a Weed Eater Head
Here are some tips for unscrewing a weed eater head:
Inspect the Bolts
Before unscrewing the bolts, inspect them to make sure they are not corroded or rusted. If they are, use an appropriate lubricant to loosen them.
Use the Appropriate Tool for the Job
Make sure to use the right tool for the job. Using the wrong tool could strip the screws or damage the head.
Check for Rust or Corrosion
If the bolts are rusty or corroded, use a lubricant to loosen them. Make sure to use an appropriate lubricant for the job.
How to Take Apart a Weed Eater Head in 4 Steps
Here are the steps to take when taking apart a weed eater head:
Unscrew the Bolts
Unscrew the bolts that hold the head in place. Make sure to keep track of which screws go where so that you can easily put them back in the right place when you’re done.
Disconnect the Wires
Disconnect any wires that may be attached to the weed eater head. Be careful not to pull too hard on the wires, as this could damage the connections.
Pull Off the Head
Carefully pull off the weed eater head. Be careful not to pull too hard, as this could cause damage to the head or the machine itself.
Reassemble the Parts
Once the head has been removed, put all the parts back together in the reverse order. Make sure to follow the manufacturer’s instructions when putting the parts back together.
Conclusion
Taking off a weed eater head is a straightforward process. By following the steps outlined in this article, you can safely and efficiently take off a weed eater head. Remember to always wear protective gear, use the right tools, and be careful of the blades when taking off the head. With these tips, you can confidently take off a weed eater head.
(Note: Is this article not meeting your expectations? Do you have knowledge or insights to share? Unlock new opportunities and expand your reach by joining our authors team. Click Registration to join us and share your expertise with our readers.)