Introduction
Real estate photography is the art of capturing high-quality images of properties for marketing purposes. It involves taking photographs of buildings, interiors, exteriors, landscapes, and other elements associated with a property. Real estate photography is an important tool for agents, as it helps them to showcase a property in its best light. With the right photos, they can attract more buyers and increase their chances of selling the property.

Provide Tips for Taking Quality Real Estate Photos
When it comes to real estate photography, quality is key. Here are some tips to help you take professional-looking photos:
Invest in the Right Equipment
Having the right equipment is essential for taking great real estate photos. Investing in a good camera and lens will give you the best results. Look for cameras that have a high resolution and good low light performance. You should also invest in lenses with wide-angle capabilities, as these will allow you to capture more of the property in each shot.
Use a Tripod
Using a tripod will help you capture sharp and clear images. It will also make it easier to take multiple shots of the same scene without having to adjust the camera each time. If you don’t have a tripod, try using a bean bag or something similar to stabilize the camera.
Shoot in RAW Format
Shooting in RAW format will give you more options when it comes to editing the photos. This format captures all the data from the sensor, which allows you to make adjustments to the image later on. It also gives you more flexibility when it comes to cropping and enlarging the photos.
Utilize Natural Light
Natural light is the best type of lighting for real estate photography. Try to use available light whenever possible, as this will create a warm and inviting atmosphere. If you need to supplement natural light, consider using LED lights or reflectors.
Emphasize the Space
When photographing a property, it’s important to emphasize the size and shape of the space. Try to capture the entire room in each shot, and make sure to include any interesting architectural features. You can also use furniture and accessories to draw attention to certain areas.
Use Wide-Angle Lenses
Wide-angle lenses are ideal for real estate photography, as they allow you to capture more of the space in each shot. They also provide a sense of depth and perspective, which can be helpful when shooting small rooms or tight spaces.
Analyze Different Types of Real Estate Photography
Real estate photography involves taking photos of various aspects of a property. Here are some of the different types of real estate photography:
Interior Photography
Interior photography includes shots of the living areas, bedrooms, bathrooms, and other interior spaces. When taking interior photos, be sure to capture the details of the room, such as the furnishings, décor, and architectural features.
Exterior Photography
Exterior photography involves taking photos of the exterior of a property. This includes shots of the front and back of the house, as well as any outdoor features such as decks, patios, and landscaping.
Aerial Photography
Aerial photography is the process of taking photos from an elevated position. This type of photography can be used to capture the layout of the property, as well as any surrounding features such as trees or bodies of water.
Drone Photography
Drone photography is becoming increasingly popular for real estate photography. Drones can provide unique perspectives that are not possible with traditional photography. They can also be used to capture aerial shots of larger properties or those with difficult access.
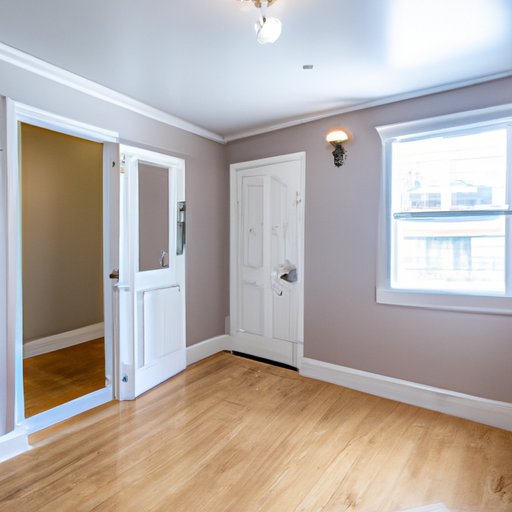
Showcase Examples of Professional Real Estate Photography
To get an idea of what professional real estate photography looks like, take a look at some examples. Here are some sample images taken by professional photographers:
Sample Images
These images show the type of quality you can expect from professional real estate photography. Notice the use of natural light, wide-angle lenses, and careful composition to make the most of the space.
Client Reviews
It’s also a good idea to check out reviews from clients who have used professional real estate photography services. These reviews can provide insight into the quality of work you can expect from a particular photographer.

Explain the Benefits of Using Professional Real Estate Photography
Professional real estate photography has many benefits, including:
Increased Interest
High-quality photos can help to attract more buyers to a property. Studies have shown that listings with professional photos receive twice as many views as those without. “In our experience, listings with professional photos get three times more clicks than those without,” says real estate agent Jim Smith.
Improved Visibility
Professional photos can help a listing stand out from the competition. With high-quality images, buyers will be able to see the property in its best light, increasing the chances of making a sale.
Establish Credibility
Professional photos can also help to establish credibility for the seller. By showcasing the property in its best light, buyers will be more likely to trust the seller and view them as reliable.

Discuss How to Use Lighting and Angles for Real Estate Photography
Lighting and angles play an important role in real estate photography. Here are some tips for getting the most out of your photos:
Lighting Techniques
When taking photos of a property, try to use natural light whenever possible. If you need to supplement the light, consider using LED lights or reflectors to brighten up dark areas. Avoid using flash, as this can create harsh shadows and wash out the colors.
Angles and Framing
When taking photos, pay attention to the angles and framing. Try to capture the entire space in each shot, and make sure to include any interesting architectural features. Using a wide-angle lens can help you capture more of the room in each photo.
Outline a Step-by-Step Guide to Real Estate Photography
Real estate photography can be daunting, but it doesn’t have to be. Follow these steps for successful real estate photos:
Preparation
Before taking photos, make sure the property is clean and tidy. Remove any clutter and personal items, and arrange furniture and accessories to create a pleasing composition. Make sure the space is well lit and free of shadows.
Shooting
When shooting, use a tripod and shoot in RAW format. Take multiple shots of each room to ensure you get the best possible photo. Try to capture the entire space in each shot, and make sure to include any interesting architectural features.
Editing
Once you’ve taken the photos, it’s time to edit them. Editing can involve cropping, adjusting exposure, and color correction. Be sure to save the original RAW files, as you may need them for future edits.
Conclusion
Real estate photography is an important tool for agents, as it helps them to showcase a property in its best light. With the right photos, they can attract more buyers and increase their chances of selling the property. By following the tips outlined in this article, you can take professional-looking real estate photos and increase your chances of success.
(Note: Is this article not meeting your expectations? Do you have knowledge or insights to share? Unlock new opportunities and expand your reach by joining our authors team. Click Registration to join us and share your expertise with our readers.)